Reptile mites can be a frustrating and painful problem for both you and your pet. These tiny parasites feed on your reptile’s skin, causing discomfort, stress, and even health issues if left untreated. But don’t worry, we’ve got you covered with our comprehensive guide on how to identify, treat, and prevent reptile mite infestations.
In this article, we’ll take a closer look at the causes and signs of reptile mites, as well as the diagnosis process, so you can catch any issues early. We’ll also explore various treatment options, from topical medications to environmental adjustments, to help your pet recover quickly. And because prevention is key, we’ll provide long-term strategies to keep those pesky mites at bay for good. Whether you’re a seasoned reptile owner or just starting out, this guide will equip you with the knowledge and confidence to tackle any reptile mite issue that comes your way.
Understanding Reptile Mites
Reptile mites can be a sneaky problem, but understanding what they are and how they affect your pet is crucial to treating them effectively. Let’s break down what you need to know about these tiny pests.
What are Reptile Mites?
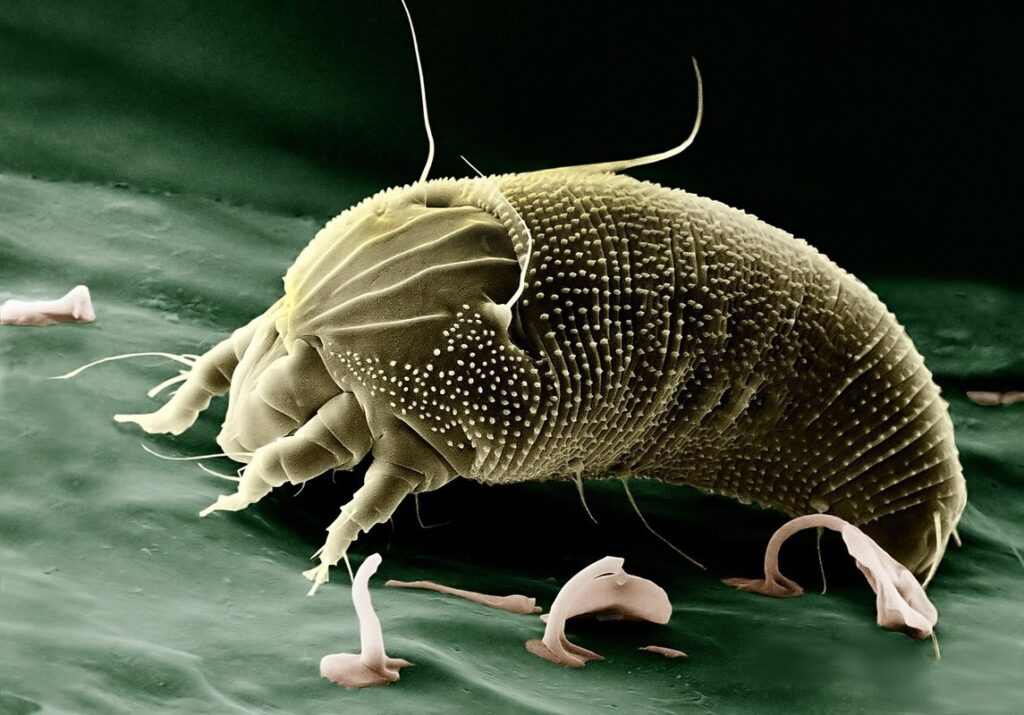
Reptile mites are tiny, eight-legged parasites that feed on the blood and skin of reptiles. These pesky creatures can cause a range of problems for pet owners, from skin irritation to full-blown infestations. If left untreated, reptile mites can lead to serious health issues, including anemia, stress, and even death.
There are several types of reptile mites, but the most common ones are the Dermanyssus gallinae (also known as red mites) and the Ophionyssus natricis. Understanding their life cycles is crucial to treating infestations effectively. For example, some mite species can survive off-host for up to 10 days without feeding, making it essential to act quickly when spotting signs of infestation.
Common signs of reptile mites include excessive scratching or biting, skin lesions, and a distinctive “dust” around the eyes, nose, or mouth. If you suspect an infestation, start by checking your reptile’s bedding for tiny, red-brown specks – a sure sign of mite presence. Keep in mind that young reptiles are more susceptible to mite infestations due to their fragile skin and immune system.
Causes and Risk Factors
Reptile mites infestations can be caused by a variety of factors that are often within our control. Poor hygiene is one of the main contributors to reptile mite outbreaks. This includes not only cleaning the enclosure regularly but also making sure to wash your hands before and after handling your pet, as well as any food or supplies you bring into the area. It’s surprising how easily these tiny pests can spread through simple contact.
Another significant risk factor is inadequate enclosure maintenance. If the enclosure isn’t properly cleaned and maintained, debris and waste can accumulate, providing a perfect environment for reptile mites to thrive. This includes failing to replace soiled substrate or neglecting to clean food and water dishes regularly.
Additionally, introducing new animals without proper quarantining is another common cause of reptile mite infestations. It’s crucial to isolate new pets for at least 30 days before releasing them into their permanent enclosure, regardless of whether it’s a reptile, amphibian, or invertebrate. This allows you to monitor for any signs of illness and prevent the spread of diseases, including parasites like reptile mites.
Identifying an Infestation
To effectively treat reptile mites, you first need to accurately identify the infestation, which starts by recognizing common signs of mite activity. Look for tiny white specks on your pet’s skin.
Signs of Reptile Mites
If you suspect that your reptile has contracted mites, there are several signs to look out for. One of the most noticeable is excessive shedding – not just the normal shedding cycle, but an abnormal amount of skin and scales falling off. This can be accompanied by irritation and inflammation around the eyes, nose, and mouth.
Another indication is changes in behavior or appetite. Your reptile may become lethargic, withdrawn, or stop eating altogether. Some owners have reported that their normally active pet becomes listless and refuses to bask under their favorite UVB light.
Other visible signs include tiny white specks on the skin, often mistaken for dandruff or dirt. However, these are actually mite eggs or young mites themselves. If left untreated, the infestation can spread rapidly, causing severe discomfort and potentially life-threatening consequences for your pet.
It’s essential to monitor your reptile closely and seek veterinary attention if you suspect an infestation. Early detection is key to effective treatment and preventing further complications.
Diagnosis and Testing
Diagnosing reptile mites can be a challenging task, but it’s essential to get an accurate diagnosis to ensure effective treatment. When suspecting an infestation, start with a physical examination of the affected animal and its environment. Look for signs such as redness, irritation, or excessive scratching on the skin, especially around joints and scales.
Next, perform a fecal exam by collecting a fresh stool sample from the reptile. This can help identify any internal parasites that may be present. If you’re not experienced in performing fecal exams, consider consulting with a veterinarian for guidance.
Other diagnostic tests include taking hair or scale samples from affected areas and examining them under a microscope for mite eggs or actual mites. It’s also crucial to inspect the reptile’s living environment, including its enclosure, substrate, and any accessories, for signs of mites.
Accurate diagnosis is vital, as misdiagnosis can lead to ineffective treatment or even harm the animal. For instance, if you mistakenly identify a skin infection as a mite infestation, the wrong treatment may be applied, which could exacerbate the issue. Always consult with a veterinarian experienced in reptile care to ensure an accurate diagnosis and develop a proper treatment plan.
Treatment Options
Now that you know how to identify and prevent reptile mites, let’s dive into the treatment options available for infested pets. We’ll explore various methods to get rid of these unwanted critters.
Topical Treatments
When it comes to treating reptile mites with topical treatments, there are several effective options available. One popular choice is permethrin, a synthetic version of the natural insecticide pyrethrum found in chrysanthemum flowers. This treatment works by disrupting the mites’ nervous system and ultimately killing them.
To apply permethrin effectively, mix it with water according to the product’s instructions (typically 1-2% concentration) and spray or dip your reptile into the solution for a specified amount of time (usually around 5 minutes). However, be sure to follow safety precautions: avoid getting the mixture on your skin or eyes, and wash your hands thoroughly after handling it.
Another treatment option is diatomaceous earth, a natural powder made from fossilized algae that dehydrates mites, causing them to die. Sprinkle the powder liberally over your reptile’s enclosure, ensuring adequate ventilation to prevent inhalation of dust particles. When choosing topical treatments, consider factors like your reptile’s age, size, and health status to ensure you’re using the most effective product for their specific needs.
Environmental Changes
When it comes to treating reptile mites, environmental modifications play a crucial role in helping your pet recover. One of the most significant changes you can make is to increase humidity levels within the enclosure. Reptiles thrive in humid environments, and this can help loosen and remove mites more effectively. To achieve higher humidity, you can use a humidifier or simply mist the enclosure with water daily.
Reducing stress is also vital during treatment. When reptiles are stressed, their immune systems weaken, making them more susceptible to infections. To minimize stress, ensure that your pet has a comfortable temperature range and provide plenty of hiding places within the enclosure. You can also try providing a shallow dish of water for your reptile to soak in, as this can help reduce mites.
Finally, improving ventilation is essential for effective treatment. Mites thrive in stagnant air, so it’s crucial to ensure that your enclosure has adequate airflow. Add some plants or use a ventilation system to improve air circulation and prevent the buildup of mites’ waste products.
Managing Infestations
When dealing with a reptile mite infestation, it’s essential to understand how to properly manage and eliminate these pesky parasites from your pet’s environment. In this section, we’ll provide you with effective steps to tackle an infestation.
Quarantine and Isolation
Quarantine and isolation are crucial steps in treating reptile mites effectively. When an infestation is identified, it’s essential to separate the affected animals from the rest of your collection to prevent further spread of the parasites. This process is called quarantine.
To set up a quarantine area, designate a separate room or enclosure with its own heat, lighting, and humidity controls. Ensure the space is well-ventilated and easy to clean. For existing pets, transfer them to the quarantine area immediately to prevent re-infestation of the main collection.
When introducing new animals to your collection, isolate them in the quarantine area for at least 30 days before integrating them with the rest. Monitor their behavior, appetite, and overall health during this period. If you notice any signs of mites or infestation, extend the isolation time accordingly.
Remember, prevention is key. Regularly inspect your animals and their enclosures for signs of mite infestations. This proactive approach will help minimize the risk of re-infestation and ensure a healthier environment for all your reptiles.
Cleaning and Disinfecting
Cleaning and disinfecting your reptile’s enclosure is crucial to eliminating mites and their eggs. It’s essential to remove all decorations, accessories, and equipment that can harbor these pests. Start by washing everything with mild dish soap and warm water. This will help loosen any debris or mite eggs that may be present.
Next, disinfect all surfaces using a reptile-safe cleaning solution. You can use a 3% hydrogen peroxide solution or a bleach-based product specifically designed for pet enclosures. Make sure to follow the manufacturer’s instructions and take necessary precautions to avoid harming your reptile. For example, never mix bleach with other chemicals, as this can create toxic fumes.
It’s also important to clean and disinfect all food and water dishes, as well as any humidifiers or misting systems. Change the bedding completely, and discard any substrate that may have come into contact with mites or their eggs. To prevent future outbreaks, establish a regular cleaning schedule and inspect your reptile’s enclosure regularly for signs of mite infestations.
Recovery and Prevention
Now that you’ve identified and treated the mites, it’s time to focus on helping your reptile recover fully and take steps to prevent future infestations from occurring. This is crucial for keeping your pet healthy and happy.
Post-Treatment Care
During the recovery period, it’s essential to provide your reptile with optimal care and attention. This includes maintaining a clean environment, ensuring proper feeding, and closely monitoring their health. Keep an eye out for signs of improvement, such as increased appetite or renewed activity.
However, vigilance is also crucial in detecting potential relapse symptoms. Monitor for changes in skin condition, shedding patterns, or unusual behavior. If you notice any adverse reactions to treatment, consult a veterinarian immediately.
It’s also vital to continue treating any remaining infestations and prevent future outbreaks by implementing preventative measures. These include maintaining humidity levels between 50-60%, reducing stress through proper housing and lighting, and conducting regular checks for signs of mites or other parasites.
A common mistake many owners make is assuming the treatment has been successful too quickly. Allow at least two to three weeks for full recovery before resuming normal care routines.
Long-term Prevention Strategies
Preventing future infestations is crucial to maintaining a healthy reptile collection. Regular inspections are essential in identifying potential issues early on. Look for signs of mites such as small white spots on the skin, excessive shedding, and lethargy. Check your reptiles’ habitats regularly, paying attention to temperature, humidity, and cleanliness.
Environmental management also plays a significant role in preventing infestations. Ensure proper ventilation in enclosures by providing adequate air exchange and maintaining a clean environment. Remove any debris or feces from the habitat daily. Use a reptile-safe cleaning product to disinfect surfaces, as some chemicals can harm your pets.
To minimize the risk of future infestations, implement prevention measures such as using diatomaceous earth in the substrate to repel mites. Replace bedding materials regularly and maintain optimal humidity levels. Monitor your reptiles’ behavior, watching for signs of stress or discomfort that may indicate a mite infestation. By incorporating these strategies into your daily routine, you can significantly reduce the risk of future infestations and ensure a healthy environment for your reptile collection.
Frequently Asked Questions
Can I treat reptile mites at home without professional help?
While it’s possible to treat reptile mites on your own, it’s essential to monitor your pet closely for signs of improvement or worsening conditions. If you’re unsure about the severity of the infestation or if treatment is effective, consult a veterinarian or experienced reptile care professional for guidance.
What should I do with my other pets while treating an infested reptile?
Quarantine and isolation are crucial in preventing the spread of reptile mites to other pets. Keep your infested pet separate from others, and thoroughly clean and disinfect their enclosures, food, and water bowls to prevent re-infestation.
How long does it take for a reptile to recover from a severe mite infestation?
Recovery time varies depending on the severity of the infestation and the effectiveness of treatment. Generally, with proper care and treatment, reptiles can start showing improvement within 1-2 weeks, but full recovery may take several months.
Can I reuse my reptile’s bedding after treating an infestation?
It’s best to discard and replace all bedding materials, including substrate, rocks, and decorations, to prevent re-infestation. Cleaned and disinfected items can be reused, but it’s essential to follow proper cleaning and disinfection protocols to ensure effectiveness.
What long-term prevention strategies are most effective against reptile mites?
Regularly inspect your pet for signs of infestation, maintain a clean and well-ventilated enclosure, and implement a rotation of bedding materials every 2-3 months. Also, consider incorporating beneficial nematodes or other natural deterrents into your reptile’s environment to prevent re-infestation.